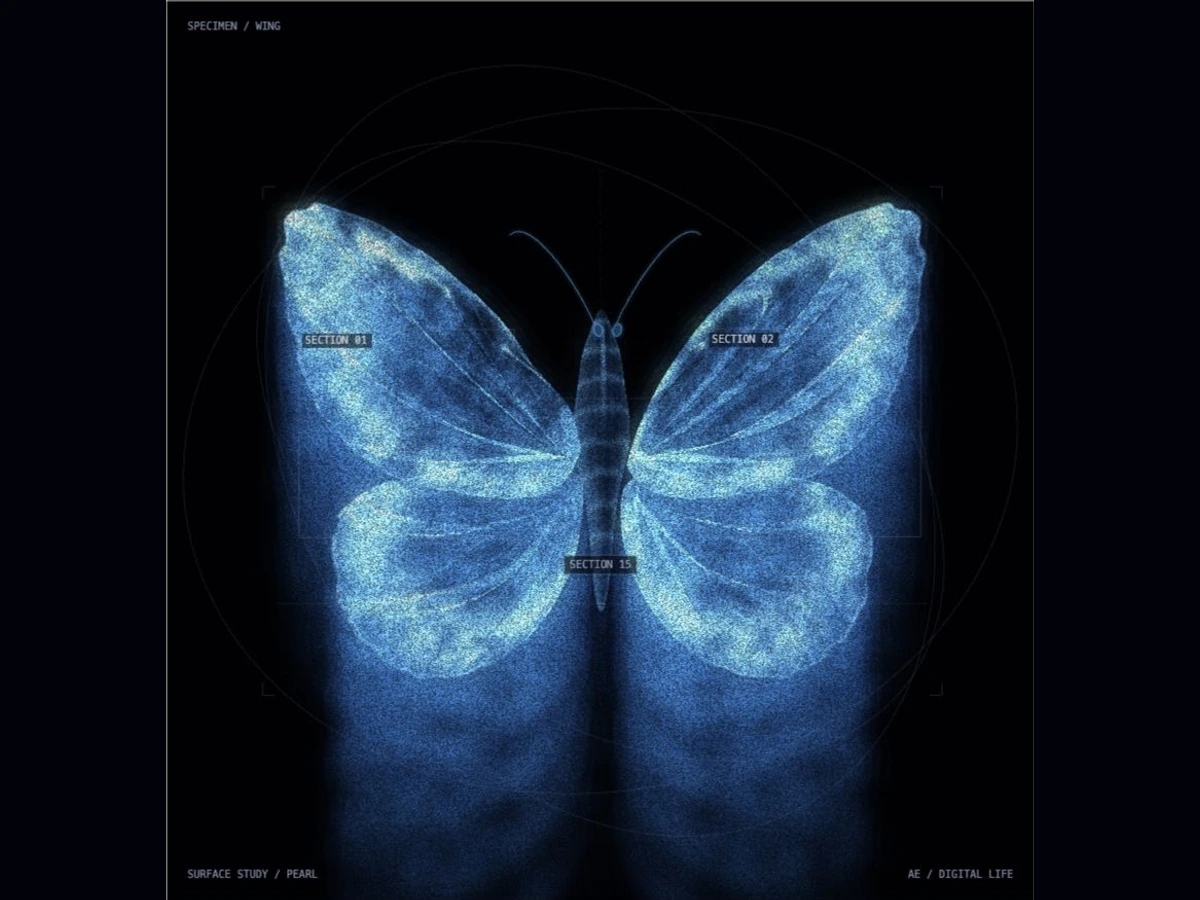
Grain breaks up the light; uneven edges and dark pockets give the wings depth. Surface finish shapes the folds and colour. Pause and sweep Grain from zero to full to study the texture separately.
Pair a luminous, almost biological centre with the precision of a scanning interface: soft curves carry the emotion; measurement lines give them a context.
In this lesson, you’ll make an original version using browser drawing tools. Start with an outline, build a curved membrane, shade its folds, add an annotation layer, then refine the surface with luminous grain, uneven edges and selective colour. Basic JavaScript helps for the code; the experiment needs no setup.
01 / A RECOGNISABLE SHAPE
Make a silhouette first.
A convincing wing needs a convincing outline. We draw three cubic Bézier segments for the upper wing and three for the lower wing, then mirror both across the centre. A narrow body connects the four patches.
P(t) = (1−t)³A + 3(1−t)²tB + 3(1−t)t²C + t³D
A and D are the endpoints. B and C are handles that steer the curve. The cell uses a different outline: r = 0.73 + 0.10 cos(6θ), with an inner boundary at 60% of the outer radius. The hole makes it read as a folded ring rather than a filled disc.
Try: select Shape and switch between Wing and Cell. Look for a readable silhouette before adding any light.
02 / A LIVING SURFACE
Give the curves a surface.
Connect each wing boundary to a point near the body. One coordinate, u, walks around the boundary; another, v, travels from the root to its edge. A grid of those samples becomes a sheet of small triangles.
patch(u, v) = root + v × (boundary(u) − root)
Now lift the sheet in depth. A gentle arch provides volume; a smaller sinusoidal displacement creates folds. The fold amplitude fades to zero at the root and outer edge, so those boundaries stay stable. Both wings receive the same displacement before mirroring.
The diagram reveals contour lines and radial threads on that surface. The lit renderer uses 144 boundary samples and 48 radial intervals per patch. Filaments changes the visible strand frequency, while Deformation changes the actual depth of the folds. Neither slider changes the number of triangles.
Try: select Membrane and pause. Increase Deformation and watch the inner contours bend. Lower Filaments to see how the sheet is organised.
03 / LIGHT AS MATERIAL
Light the folds, not every line.
Luminous surfaces and local highlights give the membrane its depth. Our renderer shades the triangle sheet using surface normals: the direction each tiny patch faces. A grazing light makes the slopes brighter or darker; a narrow sheen catches the folds.
normal = normalise(∂P/∂x × ∂P/∂y) image = lit surface + blurred bright regions spectral phase = thickness pattern + angle term
Pearl blue uses a cool, translucent material and faint displaced copies behind it, suggesting depth trails. Iridescent membrane blends cool blue with spectral colour bands. A stable thickness pattern varies across the sheet; the angle between each surface normal and the light’s half vector shifts the colour phase. As folds move, their colours and sheen change together. This is an art-directed approximation of thin-film colour, rather than a wavelength-resolved optical simulation.
Fine radial veins and softer strands add texture without becoming the whole image. The surface is rendered to a texture. A brightness mask isolates its luminous folds before horizontal and vertical blur; the soft result is combined with the sharp image. That final bloom spreads the light beyond the brightest folds.
Try: select Light, pause and switch Material. Set Glow to zero, then rotate Light direction: colour and sheen should move while the geometry stays still. Set Iridescence to zero to compare the cool base with the spectral finish. Increase Deformation to change the slopes and see the highlights reorganise.
04 / A SCANNING LANGUAGE
Give the specimen a context.
The analysis layer uses a quieter register: thin, dim orbital paths, small labels and section boxes. It should frame the organism without competing with its light.
annotation = projected sample + a section frame
The two wing boxes attach to samples on the curved patches. An additional SECTION 15 mark identifies the body. Corner brackets follow the overall bounds, while a scanning line uses the same clock as the folds. The orbit paths are art-directed, and the section labels identify visual regions rather than scientific measurements.
Try: select Scan and turn Scanning marks off. Check the material on its own. Then turn them back on: they should add the feeling of a system studying the form.
05 / THE FINISHING PASS
Make the light feel granular.
A smooth, evenly lit sheet feels synthetic. Break it up at three scales: broad dark pockets between folds, small patches of rough surface, and fine luminous grain. Keep the brightest ridges blue-white in Pearl blue; in Iridescent membrane, concentrate pink and yellow on those ridges while the valleys remain deep blue. The colour treatment grades the brightness into a blue–pink–yellow ramp, preserving blue in the shadows and warm colour in the brightest regions.
The first noise pattern belongs to fixed coordinates on the membrane. Broad patches vary its density, while smaller flecks change its brightness and the direction of its surface normals. Those tiny variations scatter the sheen. The Grain control changes that roughness and the strength of the speckles. A second, finer grain is added after bloom, so the blur cannot smooth it away. A brightness mask keeps it on the luminous form and its trails, leaving the surrounding dark space quiet.
Surface finish also makes the folds less evenly spaced and gives the perimeter small irregular scallops. The blue treatment spreads samples of the blurred bright surface downward to suggest a continuous light trail. The colour treatment uses a weaker trail and emphasises the bright folds. The body narrows toward the abdomen, and fine antennae complete the wing; the cell keeps the same texture without those features. These are designed material effects, not biological measurements.
Try: select Finish and pause. Set Surface finish to 90% and Grain to 75%. Switch to Pearl blue to study the luminous blue texture, then compare Iridescent membrane. Move Grain to zero and back without changing the folds: the surface should visibly change from smooth to granular. Use Glow for the halo and Grain for the sharp flecks. At zero Surface finish, both the shape and material return to the earlier treatment.
06 / A FAMILY, NOT A SINGLE PICTURE
Carry the rules into other sizes.
A visual identity needs to survive beyond its hero image. Keep three constants: the curve family, the blue–violet palette, and the fine analysis lines. Vary shape and density to create new compositions.
A large visual
Use fine surface strands, a modest bloom and generous empty space. Crop intentionally around the form.
A small symbol
Start from the six-lobed cell. Keep one or two contours; remove the halo and scanning marks. Test at 24 pixels in one colour.
A product interface
Use the palette sparingly for a selected state or a small illustration. Keep body text and interactive controls crisp; visual scanning lines can stay decorative.
Design motion as another shared rule: a slow breath and restrained deformation. A symbol can remain still while the hero moves. Our demo pauses when it leaves the viewport and starts still when reduced motion is requested.
YOUR TURN / ONE LANGUAGE, TWO SPECIMENS
Make a wing. Then grow a cell.
Make a wing with 48 filaments, 22% deformation and 40% glow. Select Finish, set Surface finish to 90% and Grain to 75%, then pause and save a frame. Switch to Cell and change only density and deformation. Save a second frame.
Put the two images beside each other. Can you recognise them as one family? Then select Shape and save a third frame with the cell at zero deformation. Use that silhouette as the starting point for a simplified symbol.
The lit view uses WebGL; the diagram and scanning marks use Canvas 2D. No drawing libraries are required. This is the core idea behind each curved patch; the full source includes Bézier boundaries, the material shader, the finishing pass and bloom passes.
// A boundary point comes from the Bézier outline.
const p = boundary(u);
const x = root.x + v * (p.x - root.x);
const y = root.y + v * (p.y - root.y);
const arch = Math.sin(Math.PI * v) * 0.15;
const fold = Math.sin(u * 12 * Math.PI + v * 9 + time * 0.45)
  * Math.sin(Math.PI * v) * deformation * 0.30;
const position = { x, y, z: arch + fold };
// Sample a grid of (u, v), connect it into triangles,
// then shade their normals and add bloom.
Use the downloadable starter to run the complete lesson locally: save the HTML file, open it in a browser, and edit its embedded model and drawing code in a text editor. It contains the styles, image and JavaScript, so no server or install is required.